What Is Mouse Elbow Or Computer Wrist?
If you have pain in your elbow, wrist or hand – due to your computer, tablet (or phone, for that matter)…
You may have Mouse Elbow, Computer Elbow or Computer Wrist – Although it usually goes by other, more technical names, like Repetitive Strain Injury (RSI)
And when it’s elbow pain, it most often turns out to be either:
Tennis Elbow – If it’s the OUTER elbow (Technically Lateral Epicondylopathy) OR…
Golfer’s Elbow – If it’s the INNER elbow (Technically Medial Epicondylopathy)
And, once in a while, something nerve-related, like Cubital Tunnel Syndrome – or, less likely, part of a Carpal Tunnel Syndrome injury.
On the milder side, the symptoms of Mouse Elbow or Computer Wrist can be:
- Persistent muscle fatigue and/or soreness,
- Chronic muscle tension that won’t subside with rest,
- A dull and/or throbbing muscle or tendon ache
And on the extreme side, symptoms can be:
- A more intense, burning pain,
- Sharp, stabbing pain – more serious if in the tendons,
- Nervy tingling, pain or numbness
And with these kinds of RSIs / ‘Overuse Injuries’ it’s not uncommon to also have pain in your neck, shoulders and upper arms (in addition to your elbows or hands.)
So, whether you’re just starting to feel discomfort – OR have been in pain for months or longer, here are what I believe are the 3 most important (and relatively easy) ergonomic adjustments you can make.
The “Big Three” adjustments that have benefited me tremendously over the years with all the time I’ve spent on my computer, which is pretty substantial! (I produce and edit all the content on this site, myself.)
I hope they’re as helpful to you as they were for me, but I want to be clear that once you have a full-blown RSI, it usually takes a lot more than ergo adjustments to treat the injury and truly break the cycle.
For more suggestions, including self-care tips, please also see my article at Tennis Elbow Classroom ‘Ten Tips To Healing Mouse Elbow’
Full, Original Article on Computer Related Injury Tips Here
And consider the possibility of having some Neuromuscular Therapy to help you make a full recovery – Here at Body In Balance in Marin County if you live nearby – Or from another skilled practitioner in your area, if you don’t.
Basic Workstation Ergonomics – For Home Or Office
I’m not going to exhaustively cover every possible factor here – Instead I’m going to focus on what I believe are the key factors that most people may need to address.
The 90/90/90 Rule
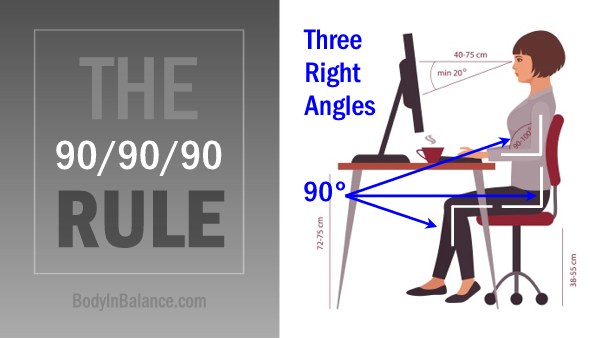
Good sitting Ergonomics: Hips, knees and elbows ideally at a 90 degree angle
Ideally, we want our knees, hips and elbows to be at a 90 degree angle – OR slightly greater.
(A greater angle, meaning closer to straight. A lessor angle means sharper, acute or bent.)
Sitting in a chair that fits well, with good back support (and NO arm rests! More on that later.)
Feet on the floor or a foot rest, knees around 90 degrees (which is the least important angle)
Hips at 90 degrees (which may be the most important joint angle) Try really, really hard to sit up straight and break your slumping habit if you have one!
(Because it’s really hard to have good alignment in the upper body if one isn’t sitting properly.)
Arms HANGING from the shoulders so the elbows are right at the side of the body and not out from the side of the body or in front of it
Elbows at 90 degrees or slightly more – This is very important, in order to allow the wrists to be straight or as close to straight as possible.
With hands and fingers ideally SUSPENDED over the keyboard with NO contact points…
Except fingers on the keys and the mouse hand where it touches the mouse pad.
And the mouse should be as close to the keyboard as you can get it…
You should never have to reach forward or out to the side for your mouse (see advantages of the narrow keyboard below)
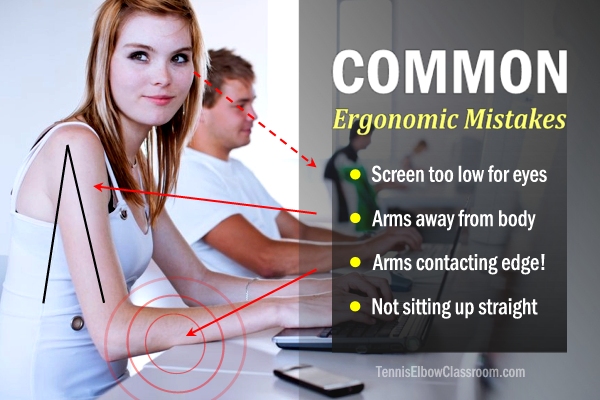
Example of common computer Ergonomic mistakes
If the type of mouse or pointing device itself is a source of trouble there are many different options available to try:
- The Vertical Mouse
- Trackballs and Touchpads
- Joysticks
But the LOCATION / positioning of your mouse or other pointing device is the most important factor – Critically important!
And whether you have a keyboard tray or your keyboard and mouse sit on a desk, you ideally want them both right in front of you.
Right THERE in front of you – Again, no reaching forward for either keys or mouse – or out to the side for the mouse.
If your arms are not hanging straight down – and your elbows are not at your side, then move your chair closer to your desk, pull your keyboard tray out (if you have one) or slide your keyboard and mouse closer to the edge of the desk.
TIP 1: Get A Quality Keyboard Tray
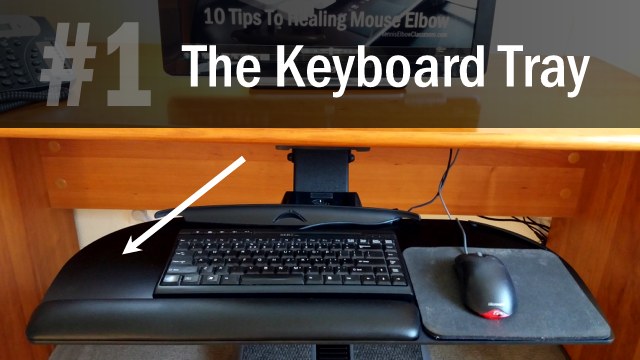
I’m a huge fan of the keyboard tray. I have one at my clinic and one in my home office, both made by Workrite.
Here’s a Workrite Keyboard Tray very similar to mine. See image below.
This one apparently costs a little more than $200. (No affiliate link or connection, by the way.)
I paid roughly that much years ago for my two trays, and they’ve been one of the best investments I’ve ever made!
It makes the most sense if you mainly sit at a desk – but if you stand half the time or more at a sit/stand desk, it may not make sense for you. (And it does require installation, FYI.)
5 things that are great about a keyboard tray:
- Because it’s thin and adjustable, you can get that keyboard and mouse less than half an inch from your lap – That allows you to have your elbows at a greater-than-90-degree angle (straighter) – More like 100-120 degrees (straighter is better for your muscles and circulation)
- And if you can add the slight negative tilt – (away from you) that makes it easier to keep your wrists straight, without flexing or extending them.
- Since the keyboard is practically in your lap if you lower the tray as far as it goes or raise your chair to meet it, it makes it easier to keep your hands “suspended” over the keys – without resting your wrists on either the wrist rest/pad if you have one
- It allows you to easily slide forward or back – (all good keyboard trays slide in and out) to get closer or further away from your monitor or desk, as needed.
- And it leaves you with a lot more space free on your desk for writing or paperwork!
TIP 2: Get A Narrow Keyboard
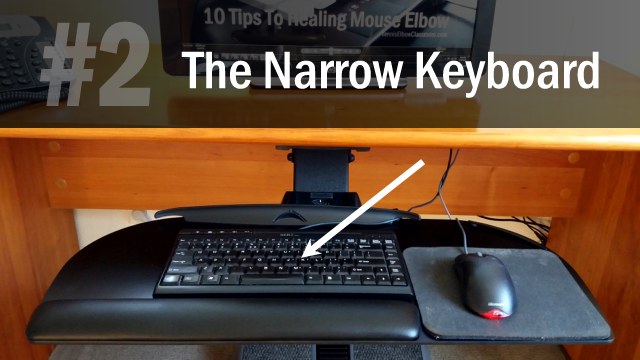
I’m a big advocate of the keyboard tray, but the most important Ergonomic tactical change I ever made was to toss the regular keyboard and switch to a narrow one.
This could easily be the simplest adjustment and cheapest hack you could make…
A narrow keyboard is one where the number pad and other extra keys to the side of the alphabet, shift and enter keys, (most often the Right side – Unless you have a Left-handed keyboard) are ommited.
WORKAROUND: If you do a lot of number crunching / data entry, just get a separate, detached number pad to use for those specific tasks, and then move it aside to make room for your mouse the rest of the time.
By “getting rid of” that extraneous (for most users) 3-4 inches – and, on some keyboards, up to SIX inches of extra stuff!…
You are able to bring your mouse in 3-6 inches closer to the ideal alignment with your shoulder – which is right in front of it.
Here’s what it looks like if you have a typical, full-sized keyboard with all the extra garbage on the side – forcing you to reach out to the side, away from your body and not allowing your arm to simply hang from your shoulder, naturally:

The typical “wide” keyboard forces you to reach out to the side to use your mouse
That may be especially helpful IF your problem is more that your dominant / mouse hand is hurting you – whether at the wrist, elbow or even your shoulder (and you have a full-sized keyboard with all the extra keys on THAT side, whether Right or Left.)
(If it’s your other hand/elbow that’s bothering you more or it’s both equally, this may not be as critical for you, but it’s still a good idea for most as a preventative measure to lessen the strain.)
TIP 3: Remove Mouse Rests And Other “Supports” And Avoid Contact Points
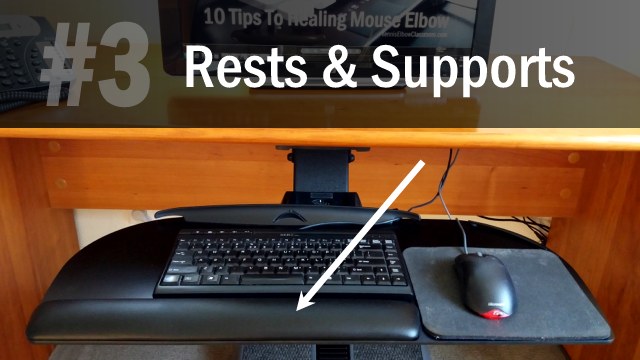
One of the worst fallacies – leading to some of the biggest Ergonomics mistakes – is the myth of the need for rests and “supports!”
There are all KINDS of rests, pads and supports out there and they are all a terrible idea, in my opinion and in the opinion of many experts, including Ergonomic Consultants.
- No Armrests – Lower (if possible) or take them off the chair!
- No wrist contact with wrist pads – or so-called “wrist supports”
- Wrist pads are especially bad in front of the mouse – because they put pressure on the wrist and finger tendons right above the Carpal Tunnel: Toss them!
- ABSOLUTELY NO resting on any kind of hard edge or surface – especially not the hard edge of a desk or laptop.
(Resting your hands on rests/pads in front of the keyboard when not typing is a “misdemeanor” and something I do myself, admittedly. Having a pad or rest in front of your mouse is the “felony!”)
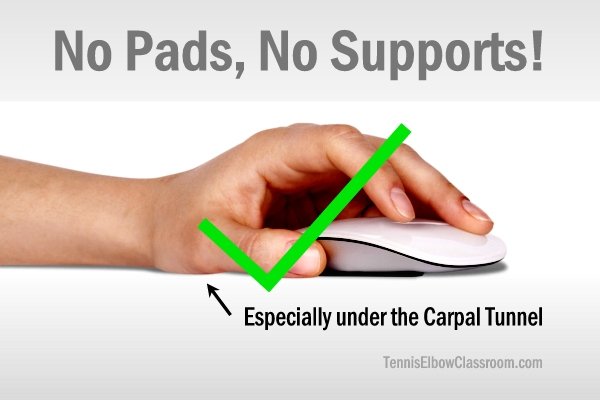
Avoid or remove rests, pads and other supports
WHY are “rests” and “supports” bad? The problem is twofold:
Because your hands and arms are meant to hang – and MOVE from – your shoulders!
It’s natural/functional biomechanics – IE: How your body is meant to move.
Your hands and elbows are not meant to be “supported” from below, like your hips and knees are supported by your feet and ankles.
That’s not how arms naturally function!
And because any pressure on the surface, as your muscles and tendons are moving back and forth, under the surface tends to cause a drop in circulation and too much friction, leading to adhesion formation.
As adhesions form in your tissues they become more and more restricted and less and less mobile.
Which is one of the largest factors at the root of these kinds of Repetitive Strain Injuries, as far as I can see.
Other Ergonomic Considerations And Suggestions
“Raised Back” Keyboards
Using a keyboard with a “raised back” causing it to tilt toward you is another mistake.
It forces your wrists into extension and you get more unnecessary friction at the your wrist joints, potentially leading to faster adhesion formation and irritation.
Having your keyboard tilt AWAY from you, however, can sometimes be a good thing, but that’s generally only when you’re using a keyboard tray.
Office Chairs
A good chair is one of the most important tools a computer user has.
Don’t hesitate to invest in a good one if you mostly sit at your desk. Find on that truly fits you.
And it’s not a decorative piece of furniture – It’s your health, comfort and productivity we’re talking about here.
It kills me to see people sitting on $99. chairs – in front of $2000-$3000. computers!
(Or $1500. chairs that are more fashion than function.)
Sit/Stand Desks
There are those who have sit/stand desks who stand most of the time and swear by it.
That is certainly a more natural / functional way to work, since we’re not meant to sit on our Gluteus Maximus Muscles, either!
If you’re comfortable standing in one place for significant periods of time then consider trying it. Standing is so much healthier than sitting!
Here’s a simple and fairly affordable solution that sits on top of an existing desk and doesn’t require a motor to move it up and down (like the more expensive options.)
(Personally, I’d rather have a root canal or listen to a politician speak than stand in one spot and do anything, though – so to each his own!)
Laptops Are Lousy – When Used “As Is”
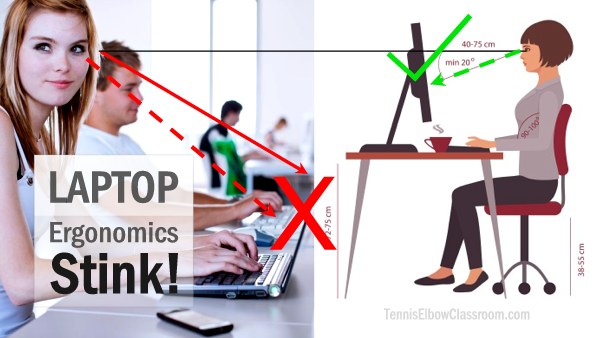
Laptop Ergonomics are inherently terrible
Ergonomically speaking, laptop/notebooks really stink! – Especially if you use one to get some work done or surf the web in bed at night!
But even if you’re not making that terrible transgression (and, whatever you do, STOP – if you are!) there is an inherent flaw with the notebook computer…
- You either have it so the screen is at the right height for your eyes and neck…
- OR you have it at the right height for typing – (Which is what almost everyone does.)
Hey, why would we call it a “Laptop,” otherwise? However…
It’s easy enough to use an external keyboard and then raise the laptop itself to the proper screen height, which is where the top of the screen is at eye level (see above/below )
This can be done esthetically and highly practically, although more expensively, with a ‘docking station’ (which has power, USB and other cable connections, so you just pull the laptop out and go without needing to disconnect cables)…
Or less expensively and still esthetically with a plain laptop holder, which just holds it in place in such a way that it’s opened way up and at an angle with the screen up high at the proper eye level…
Or inexpensively (but not so esthetically!) by simply putting the laptop on top of a box or any convenient riser – On a table or desktop, of course…
Although the screen will end up being further away from you than you may otherwise need and like.
Monitor / Screen Height
The top edge of your screen or monitor should be level with your eyes when sitting up straight and looking straight ahead with a level head.
Why? Because that will put the center of the screen at what is considered natural ‘gaze level’
It’s natural to look slightly down – Not perfectly level and straight ahead.
Think about where you look when you walk…
No, NOT at your little screen on your phone! – Please, don’t walk and text! (Although, that’s not as bad as texting while driving.)
You naturally look mostly forward – but a little bit down, to see ahead to where you’re about to walk.
However, every degree down from that optimal angle puts increasing stress on your head and neck muscles, as they work harder and harder to support that big head of yours!
(We all have heavy heads and when they are forward from our necks, they are out of alignment with the spine and out of balance with gravity.)
In time, this forward-head posture and “looking down” all the time can become really devastating to the joints of the Cervical Spine and the muscles of the head and neck.
A lot of headaches and chronic neck pain result from this – and it’s not good for the arms, either, because we tend to slouch and get round-shouldered when our head and necks are in this position.
How Does Working At A Computer Cause An Injury?
The causal dynamic of these insidious injuries is often misunderstood, over-simplified and/or glossed over in the haste of treating the symptoms. It involves:
- The build up of muscle tension (exacerbated by poor technique / posture)
- The formation of adhesions (stuck areas) between layers of muscle and tendons
- The weakening of certain muscles – Along with compensation patterns
- And when things get bad, the breakdown and degeneration of certain tendons.
The good news is, you can be in terrible pain – (including tendon pain) – from the first three things without necessarily having much if any of the 4th: Tendon damage.
How the heck is that “good news!?” It’s twofold:
- These injuries (RSIs) typically begin to hurt well before any actual damage occurs! – (In other words, you will tend to get “warning signs” as your muscles tighten and there’s too much tension on your tendons – so you usually have time to “catch it” before significant tendon damage starts happening, because it’s the tendon damage that’s The Really Serious Stuff!
- And, even if your injury has progressed to the point of damage, it’s often reversible! – (Remember, it’s a gradual process and not a permanent event, and that process can usually be reversed and the damage it causes can often be healed – Not to imply that it’s easy, however.)
So, how do you reverse this dynamic?
By releasing your muscular tension and adhesions, strengthening your weakened muscles and tendons…
And doing everything you can to stimulate healing and regeneration in your tendons if your injury has progressed to the point of damage (which is typically degeneration / Tendinosis.)
All of which takes effort. It’s work. Pills, ice, braces, shots and creams will not do it – That’s where most sufferers go wrong, however:
- Ice (here’s why that’s a bad idea)
- More and more Anti-Inflammatories (Very bad idea)
- Topical treatments like creams and liniments
- Why Wearing A Brace Is The Wrong Approach
- Why “Total Rest” Is Also Not The Key
- Maybe even a Cortisone Shot (which would be a terrible mistake!)
Treatment In The Marin County / S.F. Bay Area
If you’re fortunate to live in Marin County (or fairly close by in the San Francisco Bay Area) I may be able to help you in person, at my clinic in Corte Madera.
- Learn more about my approach to treating Tennis Elbow here
- Learn more about my Golfer’s Elbow approach here
And here’s where you can learn more about my self-help programs (available everywhere online) if you don’t live in the vicinity of my clinic, and you want to learn the best techniques from me, through video lessons:
The first description of the Repetitive Strain Injury was by an Italian physician, Bernardino Ramazzini, in the year 1700. He described the pains of the “office worker” clerks of the day:
“The maladies that afflict the clerks… arise from three causes: First, constant sitting, secondly the incessant movement of the hand and always in the same direction, thirdly the strain on the mind from the effort not to disfigure the books by errors or cause loss to their employers when they add, subtract, or do other sums in arithmetic… Incessant driving of the pen over paper causes intense fatigue of the hand and the whole arm because of the continuous and almost tonic strain on the muscles and tendons…”
De Morbis Artificum Diatriba [Diseases of Workers] Nat. Inst. of Health
“Repetitive strain injury (RSI) and associative trauma orders are umbrella terms used to refer to several discrete conditions that can be associated with repetitive tasks, forceful exertions, vibrations, mechanical compression, or sustained/awkward positions… Examples include edema, Tendinosis (or less often Tendinitis), Carpal Tunnel Syndrome, Cubital Tunnel Syndrome, De Quervain syndrome, thoracic outlet syndrome… golfer’s elbow (medial epicondylitis), tennis elbow (lateral epicondylitis), trigger finger… etc.”